DIY Boat Solar Panel Installation: Our 780W 12V Sailboat Setup (Step-by-Step) ⚓☀️
- ericaoliviasilva24
- Apr 15
- 5 min read
Updated: 6 days ago
This post contains affiliate links. If you click a link and make a purchase, I may earn a small commission at no extra cost to you. This helps support our life aboard and keeps the boat (and Luna 🐈⬛) running comfortably.

Upgrading to solar was one of the biggest unknowns for us when we moved aboard.
We didn’t have an existing system. No panels, no wiring, no clue — just a goal: build a setup that could comfortably power our liveaboard life without constantly worrying about batteries.
So we went all in and installed a 780W boat solar system on our 44ft sailboat — and honestly, it’s been a complete game changer. In this guide, I’ll walk you through exactly how we installed it step-by-step, including the mistakes we avoided and the one decision that saved us a fortune.
If you're completely new to boat electrics, this pairs well with our full breakdown here: How to Power Remote Work on a Sailboat
System Overview
Before diving into the install, here’s the full setup so you can actually visualise it:
4 × Eco-Worthy 195W bifacial solar panels (780W total)
12V battery bank
2 × Victron SmartSolar MPPT controllers
Panels wired in parallel (important!)
Each MPPT controls 2 panels (parallel input)
Marine-grade fusing on both sides of each MPPT
Why we chose this setup:
Parallel wiring = better performance in partial shade
Two MPPTs = built-in redundancy (if one fails, we still have power)
Bifacial panels = extra gain from reflected light off the water
🧰 Exact Parts We Used
If you want to replicate this system, this is exactly what we used — it’s a simple, reliable setup that’s been working brilliantly for us as full-time liveaboards.
Eco-Worthy 195W Bifacial Panels – Great performance even in low UK light
Victron SmartSolar MPPT – Reliable, easy to monitor via app
NOA Mounting Arms (25mm) – Adjustable + rock solid at sea
Marine Solar Cable – Properly rated for outdoor/marine use
Inline DC Fuses – Essential for safety
316 Stainless Steel Bars – Our budget mounting hack

🛠 Step 1: Building a Solid Mount (Replacing Guard Wires)
This was the biggest win of the whole project. Instead of installing an expensive solar arch, we replaced our flexible guard wires with solid stainless steel bars.
What we did:
Measured the distance between stanchions
Ordered 316 stainless steel bars cut to size
Installed them as rigid side rails
How We Attached the Rails to the Stanchions
One thing that’s easy to overlook is how you actually fix the stainless bars to your stanchions.


We used:
316 Stainless Steel 4-way cross connectors — used for main structural joins
316 Stainless Steel T pipe connectors (90° tees) — helped stabilise and extend sections
Bimini top fittings / eye ends — surprisingly useful for clean connection points and adjustability
These were a bit of a game changer because:
They clamp directly onto the stanchions
Let you join rails cleanly without welding
Make the whole setup adjustable before tightening
💡 This approach meant we could build a really solid frame without any custom fabrication.
Why this works so well:
Strong enough to support multiple panels
Much cheaper than marine-specific mounting kits
Clean, minimal look
💡 This one decision saved us hundreds and made the whole install feel much simpler. If you’re curious how this fits into the rest of the boat, you can see the full layout here: Inside Our Liveaboard Sailboat: A Full Boat Tour

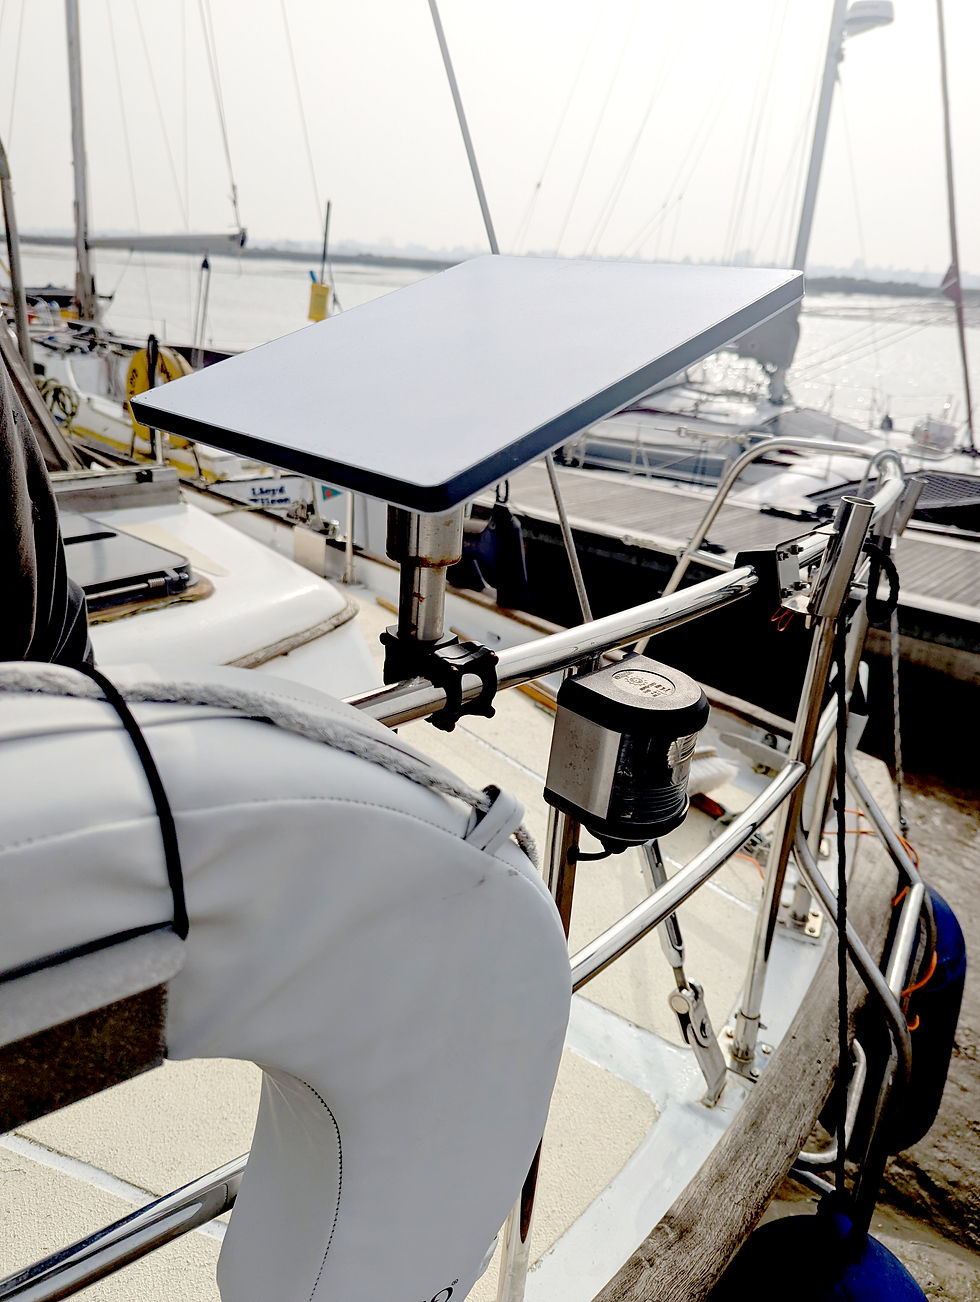
Step 2: Mounting the Solar Panels
We used NOA adjustable mounting arms to attach the panels to the rails. Honestly one of the best purchases in the whole build because they let us tilt the panels and fold them flat when needed.
Installation:
Attach NOA arms to the stainless rails
Bolt panels onto the arms
Set them flat by default (we tilt them at anchor when possible)
Why NOA arms are worth it:
You can tilt panels toward the sun
Panels fold down in strong wind or when underway
Super solid once tightened
💡 Tip: Check boom clearance before locking everything in place.

⚡ Step 3: Wiring Layout (Simple Explanation)
This is where things can get confusing, so we kept it as simple as possible. Here’s exactly how ours is set up: We split the system into two identical solar arrays:
MPPT 1:
Panel 1 + Panel 2 (wired in parallel)
MPPT 2:
Panel 3 + Panel 4 (wired in parallel)
What “parallel” means here:
Voltage stays consistent (ideal for 12V systems)
Current increases
Shading on one panel doesn’t kill the whole system
Step 4: Wiring & Safety
This is the part you don’t want to rush.
We installed:
Panel-side protection:
15A inline fuse per panel pair
Protects wiring before it reaches the controller
MPPT to battery protection:
Fuse between each MPPT and battery bank — protects your system if anything goes wrong
Sized appropriately for controller output
Cable routing:
Marine-grade cable throughout
Secured and protected against chafe
We also installed a DC isolator / combiner box between the panels and the rest of the system.
1-string PV combiner box with 32A breaker (IP66 waterproof)
👉 This gives you a really easy way to shut off solar input completely, which is incredibly useful for maintenance or troubleshooting.

🔧 Small Parts You’ll Definitely Need (Don’t Skip These)
These are the bits that are easy to forget but make the install much smoother:
Cable glands (deck entry) — gives you a clean, waterproof way to bring cables into the boat
Heat shrink tubing — makes connections properly sealed and long-lasting
Cable clips / mounts — stops everything moving around underway
MC4 connectors / branch connectors — for splitting panels cleanly in parallel
Multimeter — incredibly useful for testing before you power everything up
Pipe cutter — we used this to cut stainless tubing cleanly, which made fitting everything much easier
These are small purchases, but they make a big difference to how “finished” and reliable the system feels.
💡 Important: Always connect the battery to the MPPT before connecting solar panels — this is one of those things that can cause issues if you get it wrong.
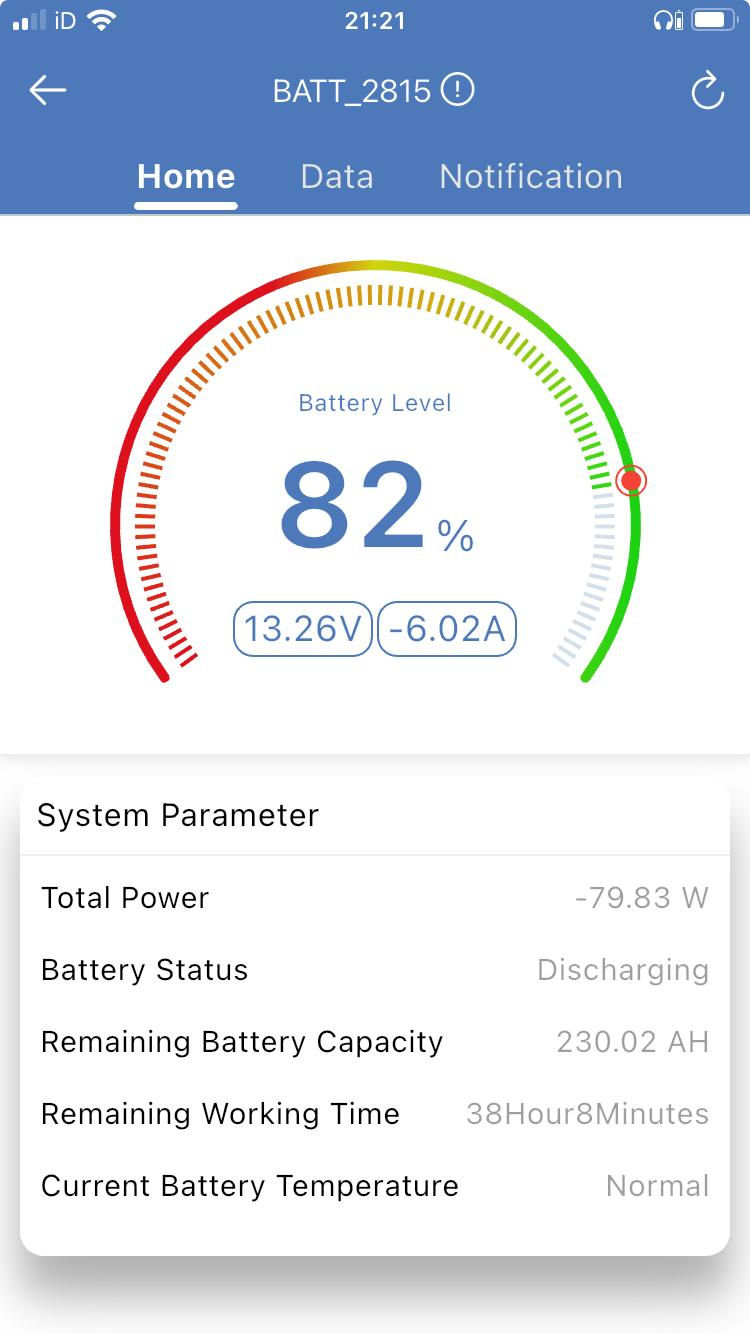
Step 5: Testing & First Power-Up
Before calling it done, we tested everything step-by-step:
Confirmed MPPTs were detecting input
Verified charging into the batteries
Monitored performance over a full day
Checked voltage from each panel array (this is where the multimeter becomes essential)
Results (Was It Worth It?)
Honestly — yes. We went from having zero solar to a system that now comfortably powers our daily life onboard. Even in typical UK conditions (cloud, grey skies, all of it), we’re still generating enough to stay on top of our usage.
⚓ Lessons Learned (If You’re Doing This Yourself)
Parallel wiring is simpler and more forgiving for 12V boats
Splitting across two MPPTs adds resilience
Mounting doesn’t have to be expensive if you think creatively
Plan your cable runs before installing panels
Always fuse your system properly
If you want to replicate this setup, all the parts we used are here — it’s a straightforward build once you break it down.
FAQ: Boat Solar Setup
Do you wire boat solar panels in series or parallel?
For a 12V system like ours, parallel is simpler and handles shading better.
How much solar do you need for a liveaboard boat?
It depends on usage, but our 780W setup comfortably supports daily life living and working onboard.
Are bifacial solar panels worth it on a boat?
Yes — especially on the water where reflected light boosts output.
📚 Related Posts
If you’re building out your boat setup, these will help:
If you're planning your own boat solar setup and get stuck, feel free to reach out and comment below — we started from zero, it’s absolutely doable.


Comments